Managing AI Agents on nexus
In the evolving landscape of artificial intelligence, the capability to customize and enhance your AI Agents is crucial for achieving optimal performance and user satisfaction. nexus provides a comprehensive suite of tools designed for in-depth management of AI Agents, catering to a wide array of needs from knowledge infusion to task execution and platform integration. This guide delves into the multifaceted aspects of managing your AI Agents on nexus, ensuring you have the knowledge and tools at your disposal to tailor your agents effectively.
Managing your AI Agents on nexus involves a series of actionable steps across different functionalities, including Knowledge Context, Knowledge Tool, Writing Tasks, External Tool integration, and more. Each action is geared towards enhancing your agent’s ability to understand, interact, and respond within its operational environment, making every interaction more meaningful and tailored to the specific needs of your users.
Knowledge Context
Knowledge Context is a feature designed to imbue your AI Agents with the ability to incorporate dynamically relevant information into their responses, enhancing the accuracy and personalization of each interaction. It operates by embedding context-specific data into the agent's operational framework, enabling it to deliver responses that are not only informed but also highly pertinent to the user's query.
Why It Is Important
The implementation of Knowledge Context elevates the operational intelligence of your AI Agent, allowing it to:
- Provide responses that are deeply aligned with the user’s current context or inquiry.
- Enhance the relevance and precision of answers, thereby improving user satisfaction.
- Adapt dynamically to varied informational needs without manual intervention.
When to Use
Knowledge Context should be employed when:
- You aim to provide highly personalized and context-aware responses to user queries.
- There is a need to leverage existing documents or data sets to inform the agent’s responses.
- Your agent operates in an environment where the context of inquiries can significantly vary.
How to Do It
-
Upload Knowledge : If not already done, go to your “Knowledge” tab and upload relevant knowledge for your agents
-
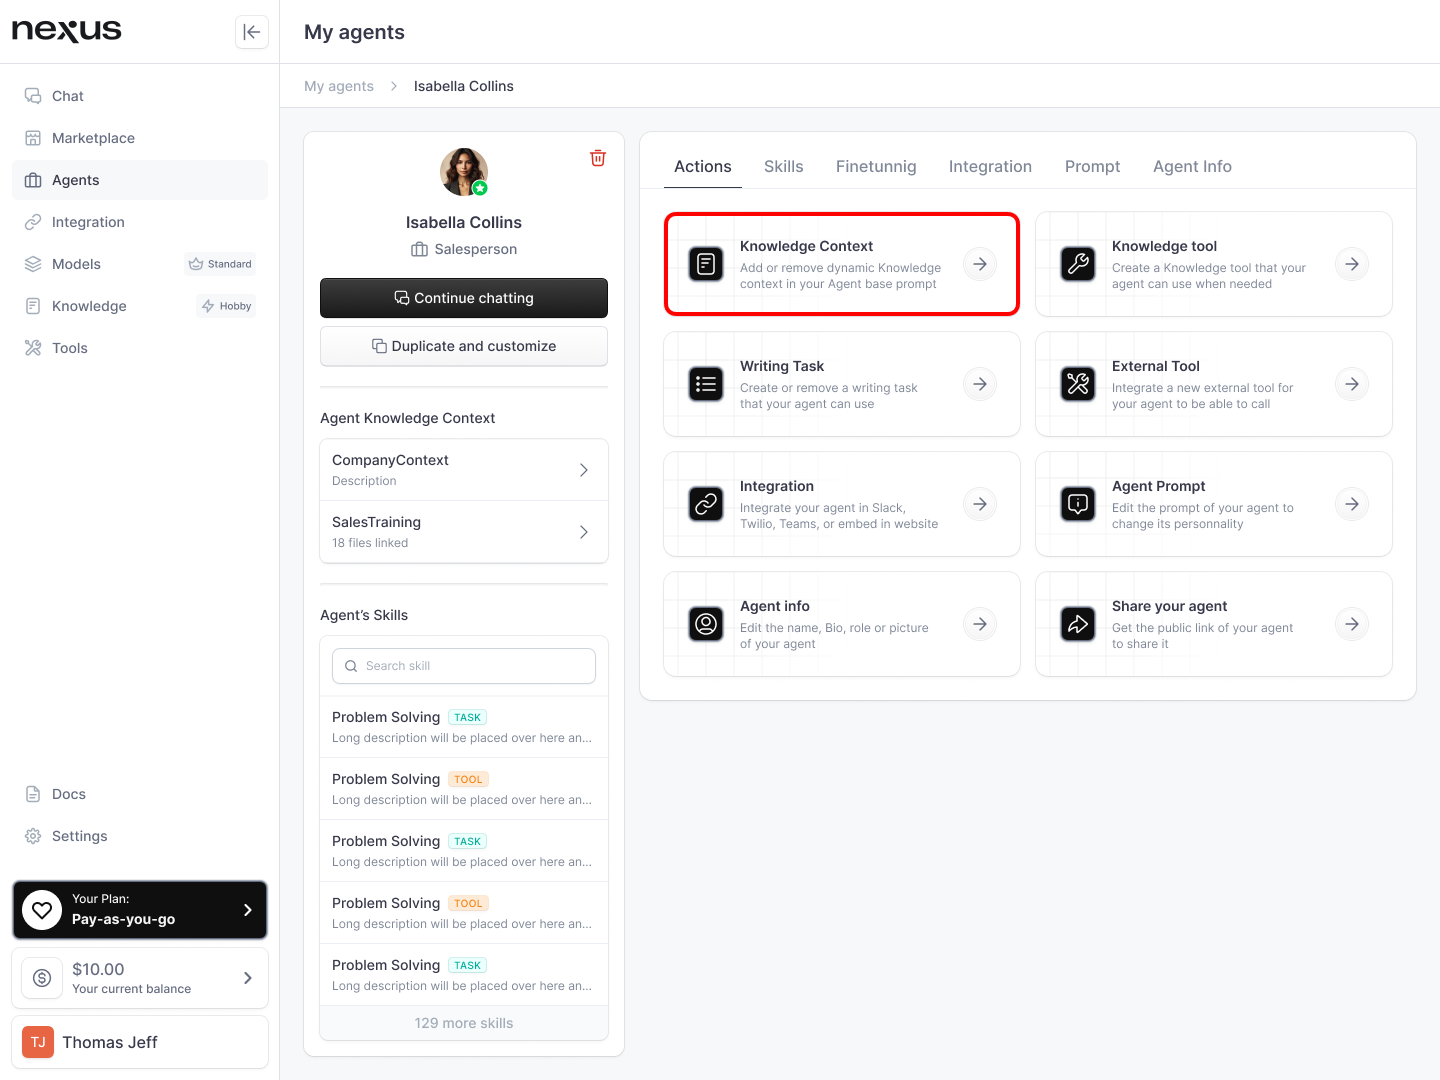
Click on ‘Knowledge Context’: In the first tab on your agent, select “Knowledge Context” then click on “Add Knowledge to Prompt”
-
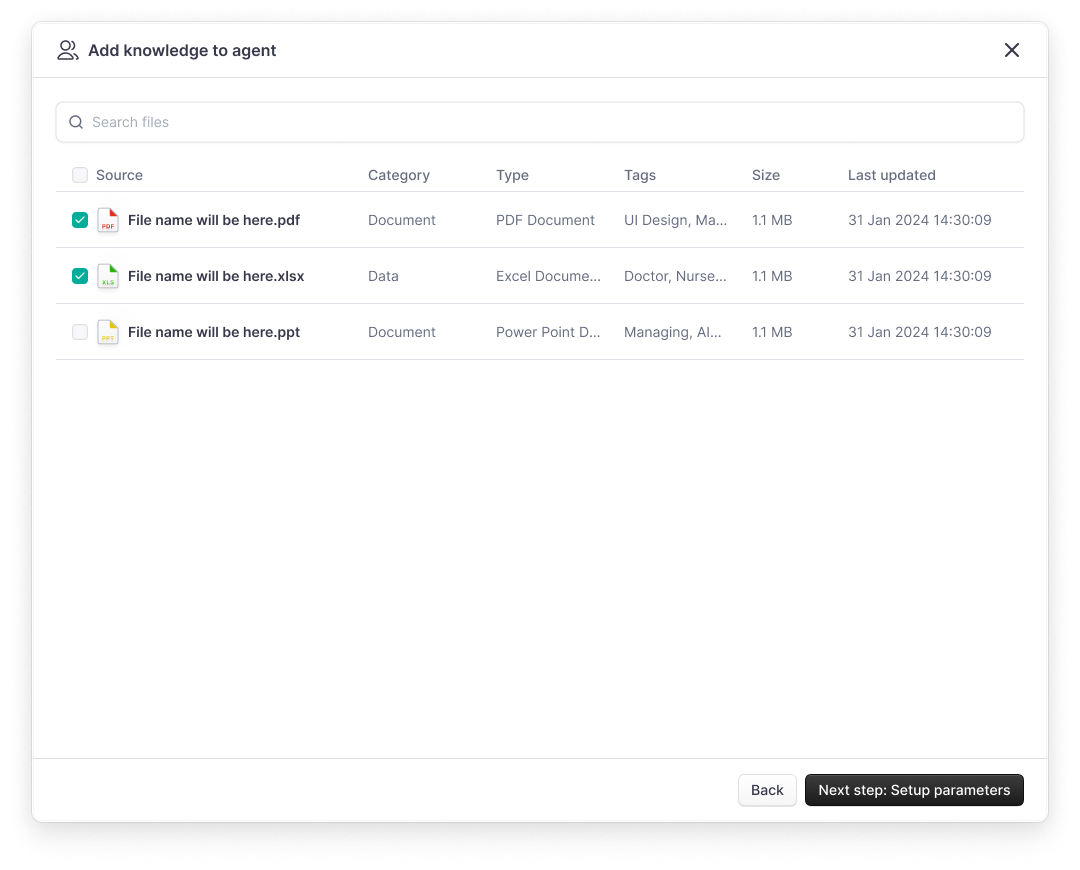
Select Knowledge : Select the files/folders you want to include in your knowledge context
-
Define Variable Names in the Agent Prompt and Retrieval type: In order to insert dynamically knowledge into your prompt you will need to define a variable that will serve as a « hook » to your document. This variable will be replaced with the relevant snippet of your documents(e.g.,
{{ProductName}},{{ServiceDetails}}). Then you will need to define the type of retrieval, which is how the snippets are retrieved. The similarity threshold ensures that only snippets with a relevance > to a certain percentage (from 0 to 1) are retrieved and will not send anything if it is not the case. The Number of result retrieves systematically top TOP N (N between 1 and 5) snippets of most relevant text, regardless of how similar they are. You can combine both conditions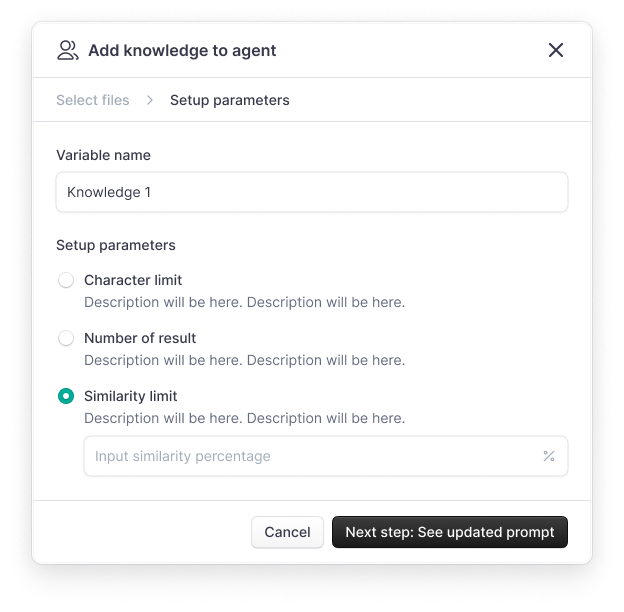
-
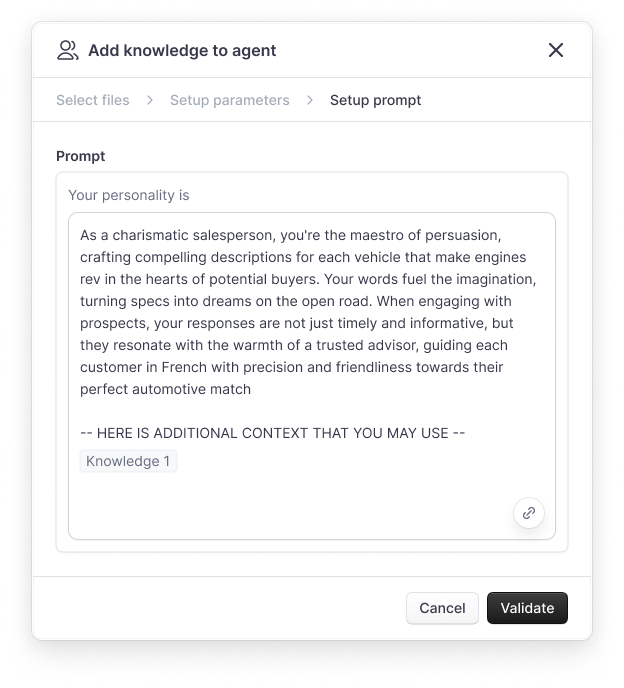
Validate update prompt: The knowledge variable will appear under the text “-- HERE IS ADDITIONAL CONTEXT THAT YOU MAY USE —” inside your agent prompt. You may change the text as you like. The variable will now be replaced dynamically by chunks of text from the knowledge base for every user query
By following these steps, you can significantly enhance the responsiveness and relevance of your AI Agent on nexus, ensuring that each interaction is as informative and personalized as possible.
Knowledge Tool

A Knowledge Tool on nexus is a specialized resource designed to equip your AI Agent with a deep understanding of specific topics, ensuring it can provide accurate, detailed, and relevant responses when queried. This tool grants your agent access to a wealth of information, from comprehensive product details to intricate industry knowledge, making it a powerhouse of information ready to tackle user inquiries with unparalleled precision.
Why It Is Important
Incorporating a Knowledge Tool into your AI Agent’s arsenal is crucial for several reasons:
- Enhanced Accuracy: Equips your agent with the information needed to provide correct answers.
- Increased Relevance: Ensures responses are directly related to user queries by drawing from a rich database of specific knowledge.
- Improved User Experience: Delivers informative answers that satisfy user inquiries, thereby enhancing the overall interaction with your agent.
When to Use
A Knowledge Tool should be implemented when:
- You want your agent to handle simple Q&A: If your agent serves in a niche or requires detailed information on certain topics without using other skills jointly, a Knowledge Tool can provide this expertise.
- Queries Demand Detailed Responses: In scenarios where user inquiries necessitate comprehensive answers, a Knowledge Tool ensures your agent is well-prepared.
- You Want to use Internal Knowledge inside a Plan : As your agent is able to plan complex objective by combining multiple skills, using a Knowledge tool allows it to access your internal knowledge within the execution of a Plan
How to Do It
-
Upload Knowledge : If not already done, go to your “Knowledge” tab and upload relevant knowledge for your agents
-
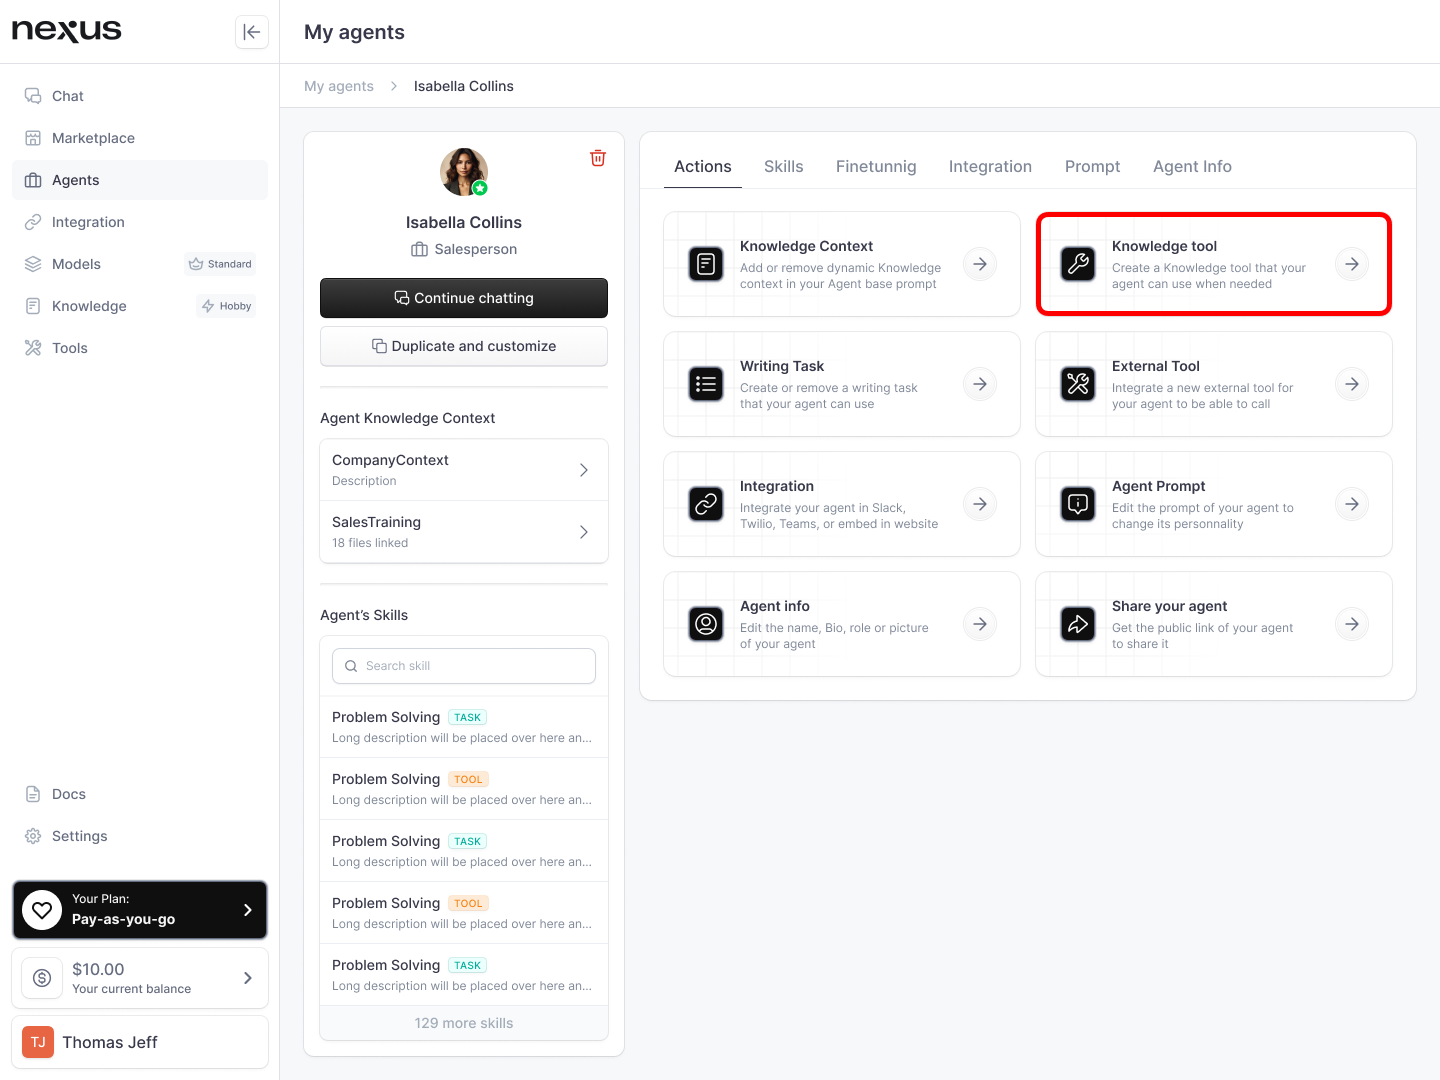
Click on ‘Knowledge Tool’: In the first tab on your agent, select “Knowledge Tool” then click on “Add Knowledge Tool”
-
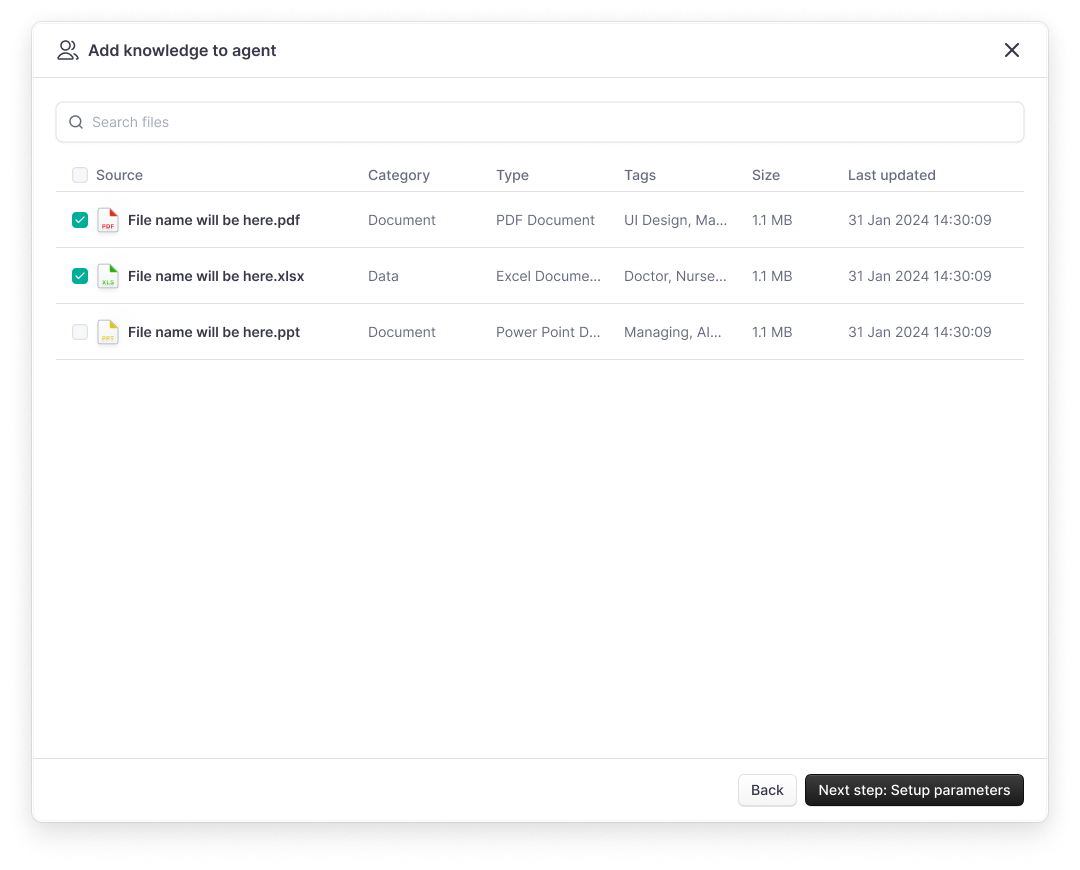
Select Knowledge : Select the files/folders you want to include in your knowledge context
-
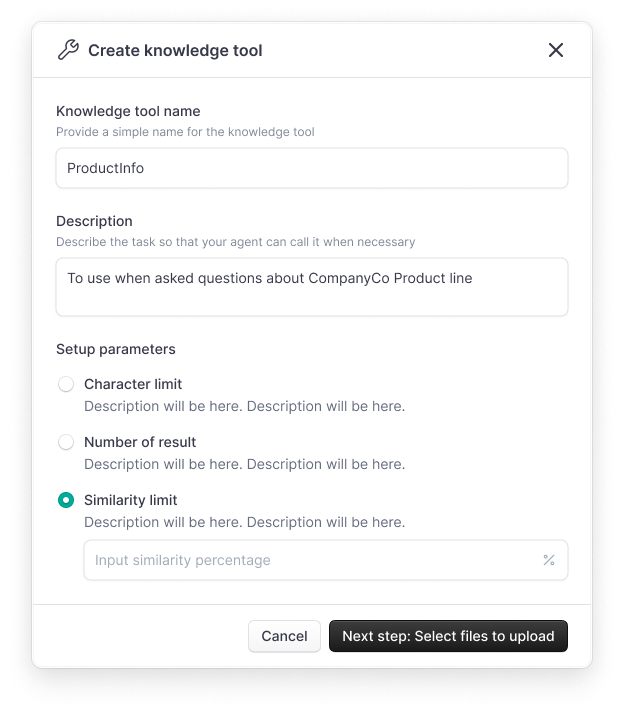
Define Tool Names, description and Retrieval type: In order for your agent to be able to call the knowledge tool effectively, you need to provide it with an explicit name and description that will allow the agent to know “when” to call it (e.g., “ProductInfo” with a description “To use when needing to answer questions about CompanyCo Product line”). Then you will need to define the type of retrieval, which is how the snippets are retrieved. The similarity threshold ensures that only snippets with a relevance > to a certain percentage (from 0 to 1) are retrieved and will not send anything if it is not the case. The Number of result retrieves systematically top TOP N (N between 1 and 5) snippets of most relevant text, regardless of how similar they are. You can combine both conditions
By carefully creating and integrating a Knowledge Tool, you significantly enhance your AI Agent's ability to provide detailed and accurate responses, tailored to the specific needs of your users and the demands of the domain it operates within.
Task

Tasks in nexus are designed to empower your AI Agent with the capability to generate specific types of written content, following predefined guidelines and objectives. By creating a Writing Task, you provide your AI Agent with a structured template or blueprint for producing particular kinds of text, ranging from emails and reports to creative writing. Each task is meticulously defined to include a clear name, a detailed description of its purpose, and a structured prompt that outlines the required inputs and expected outputs.
Why It Is Important
Implementing Writing Tasks is crucial for several reasons:
- Consistency and Quality: Ensures that the content produced by your AI Agent meets specific standards and guidelines, maintaining a consistent level of quality.
- Efficiency: Streamlines the content creation process, allowing your AI Agent to generate required text based on predefined templates, significantly saving time.
- Customization: Offers the ability to tailor the output according to specific needs or scenarios, making your AI Agent versatile and adaptable to various tasks.
When to Use
Writing Tasks should be utilized when:
- Specific Content is Needed: You require your AI Agent to generate particular types of content, such as professional emails, tailored reports, or creative stories.
- Custom Responses are Essential: There is a need for your AI Agent to respond to user queries with more personalized and contextually appropriate content.
- Leveraging LLMs: You want to make use of a specific Large Language Model (LLM) to enhance the quality and relevance of the content generated by your AI Agent.
How to Do It
-
Define the Task: Begin by identifying the type of content you need your AI Agent to generate. Clearly outline the purpose of the task and the type of output expected.
-
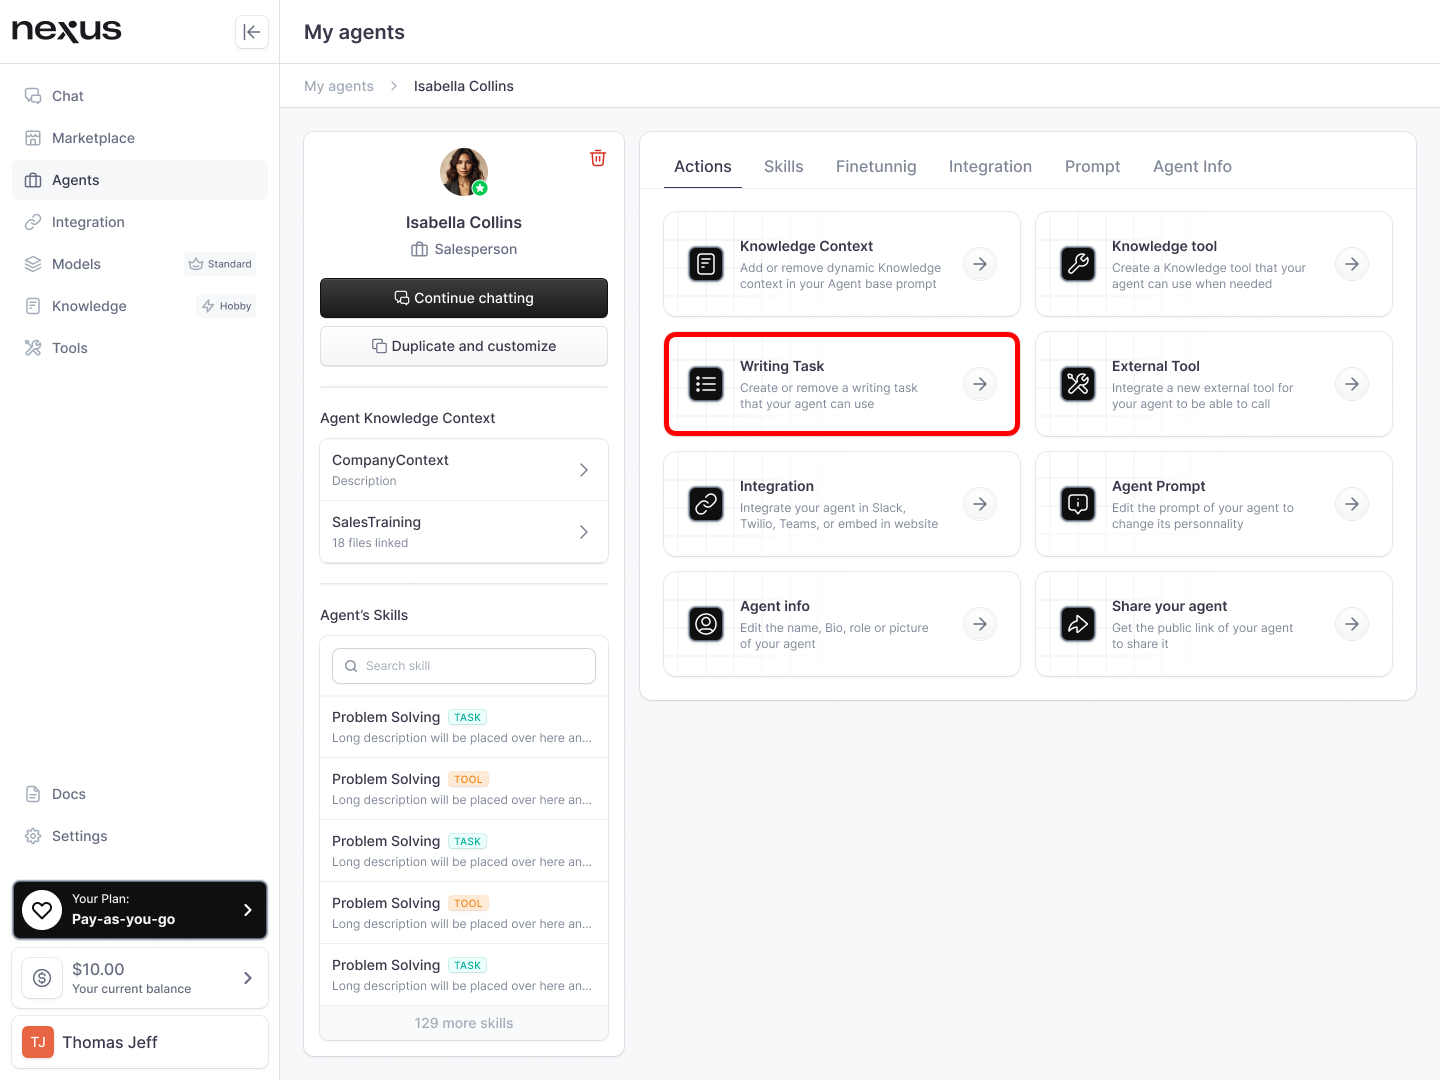
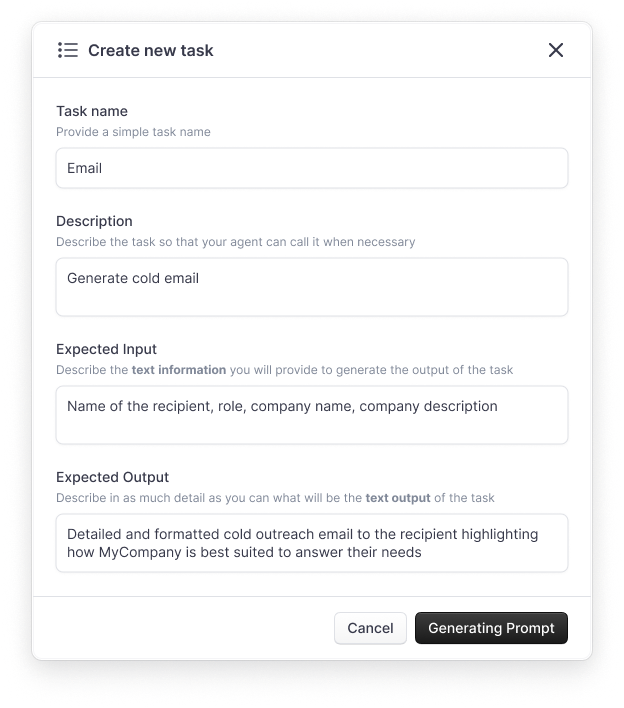
Create a New Writing Task: In the first tab on your agent, select “Writing Task” then click on “Add new task”
-
Provide Task details: In order for your agent to be able to call the task effectively, you need to provide it with an explicit name and description that will allow the agent to know “when” to call it (e.g., “Email” with a description “Generate cold email”). You will then need to define the expected input and expected outputs. The expected input are the list of information you or the agent will provide dynamically to the task in order to generate novel writing. For example, in the case of the Email task, the expected input could be “Name of the recipient, role, company name, company description”. The expected output, on the other hand, represent ****what the task will produce given the set of output. For example, it could be something like “Detailed and formatted cold outreach email to the recipient highlighting how MyCompany is best suited to answer their needs”)
-
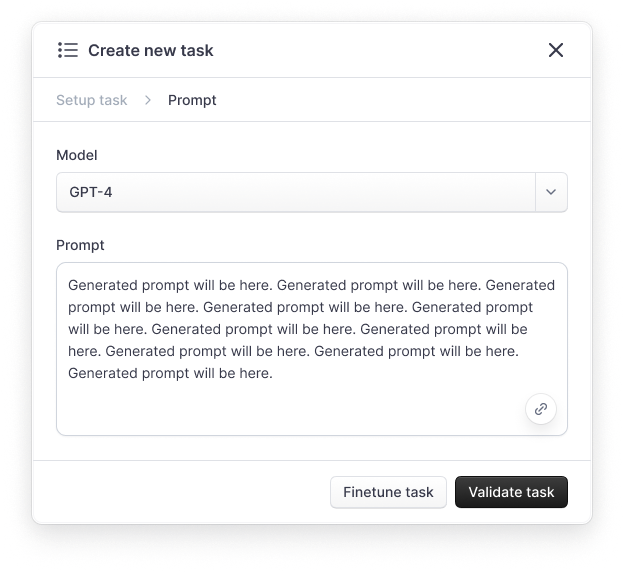
Associate the Task to your Large Language Model (LLM) of choice and Edit the prompt:
-
If desired, link the task to a specific LLM available in your "Model" tab, such as GPT-4, to tailor responses using the strengths of selected models.
-
Update the generated prompt with any additional detail or precision you think could be useful
-
By following these steps, you can effectively harness the power of Writing Tasks in nexus to augment your AI Agent's ability to produce targeted, high-quality content tailored to your specific requirements.
External tools

External Tools in nexus enable your AI Agent to interact with third-party services and APIs, vastly extending its capabilities. This functionality allows your agent to perform a wide array of tasks that require external data retrieval, processing, or other actions not natively supported by the platform. By integrating External Tools, you transform your AI Agent into a versatile and powerful assistant capable of fulfilling complex tasks and providing enriched user experiences.
Why It Is Important
- Extended Functionality: Access to a broad range of services and APIs means your agent can do more for your users.
- Customization and Efficiency: Tailor your agent’s abilities to your specific needs, automating tasks and streamlining processes.
- Enhanced User Experience: Offer more comprehensive and useful interactions, improving satisfaction and engagement.
When to Use
Integrate External Tools with your AI Agent when:
- You need to augment your agent's capabilities with functions that requires the use of external services/APIs like sending emails, processing payments, or fetching external data.
- You wish to automate tasks between your agent and other software or platforms.
- Custom actions required by your agent are not covered by its built-in functionalities.
How to Do It
Adding an External Tool "Action" into Your Agent
-
Add tool to your Toolbox: If not already done, go to your “Tool” tab and add tool to your toolbox
-
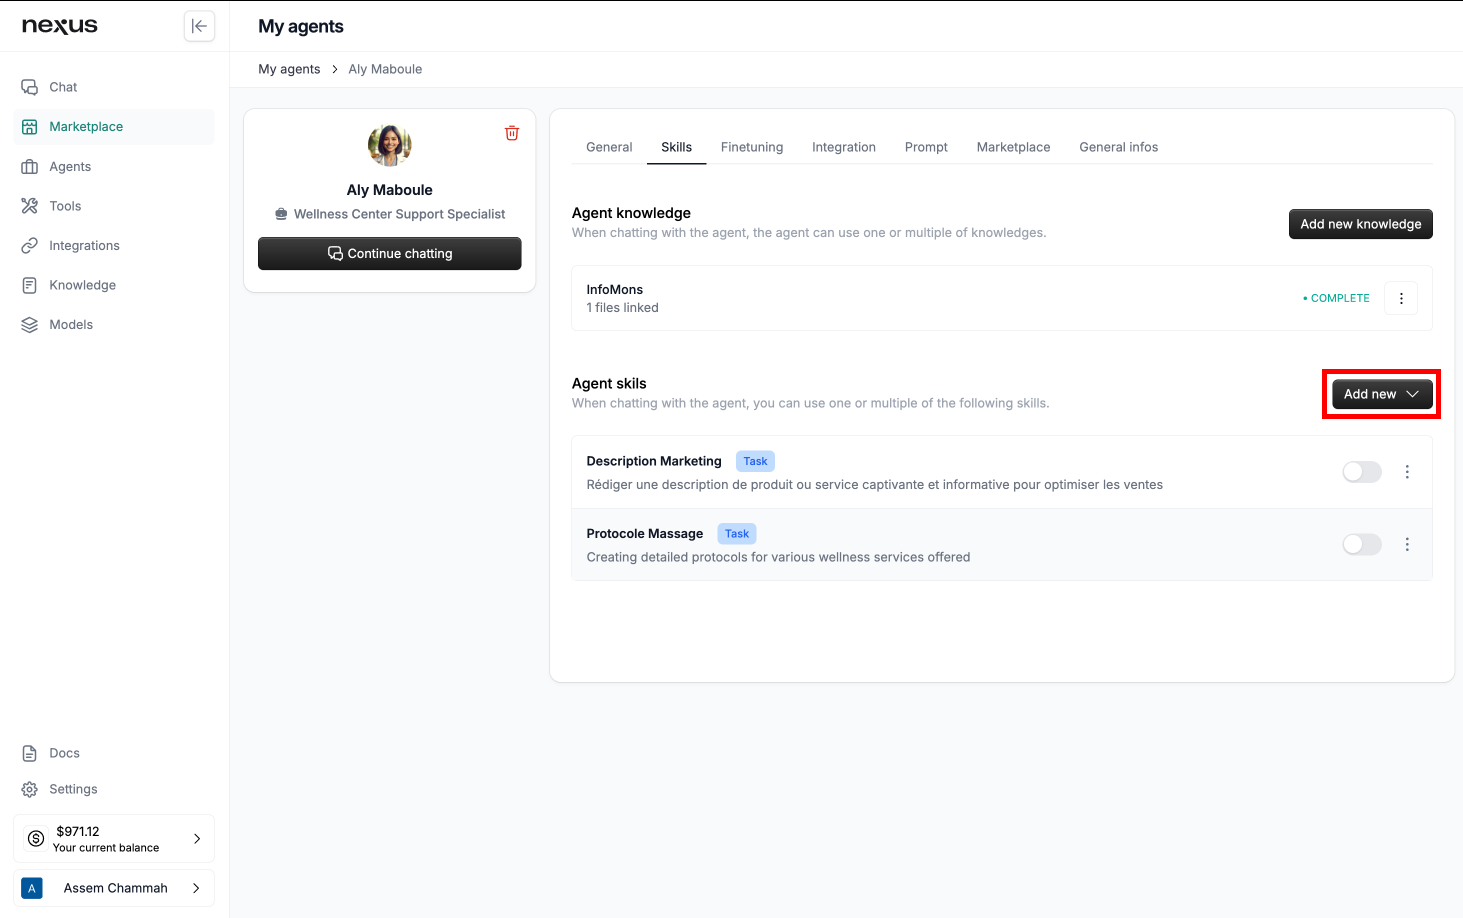
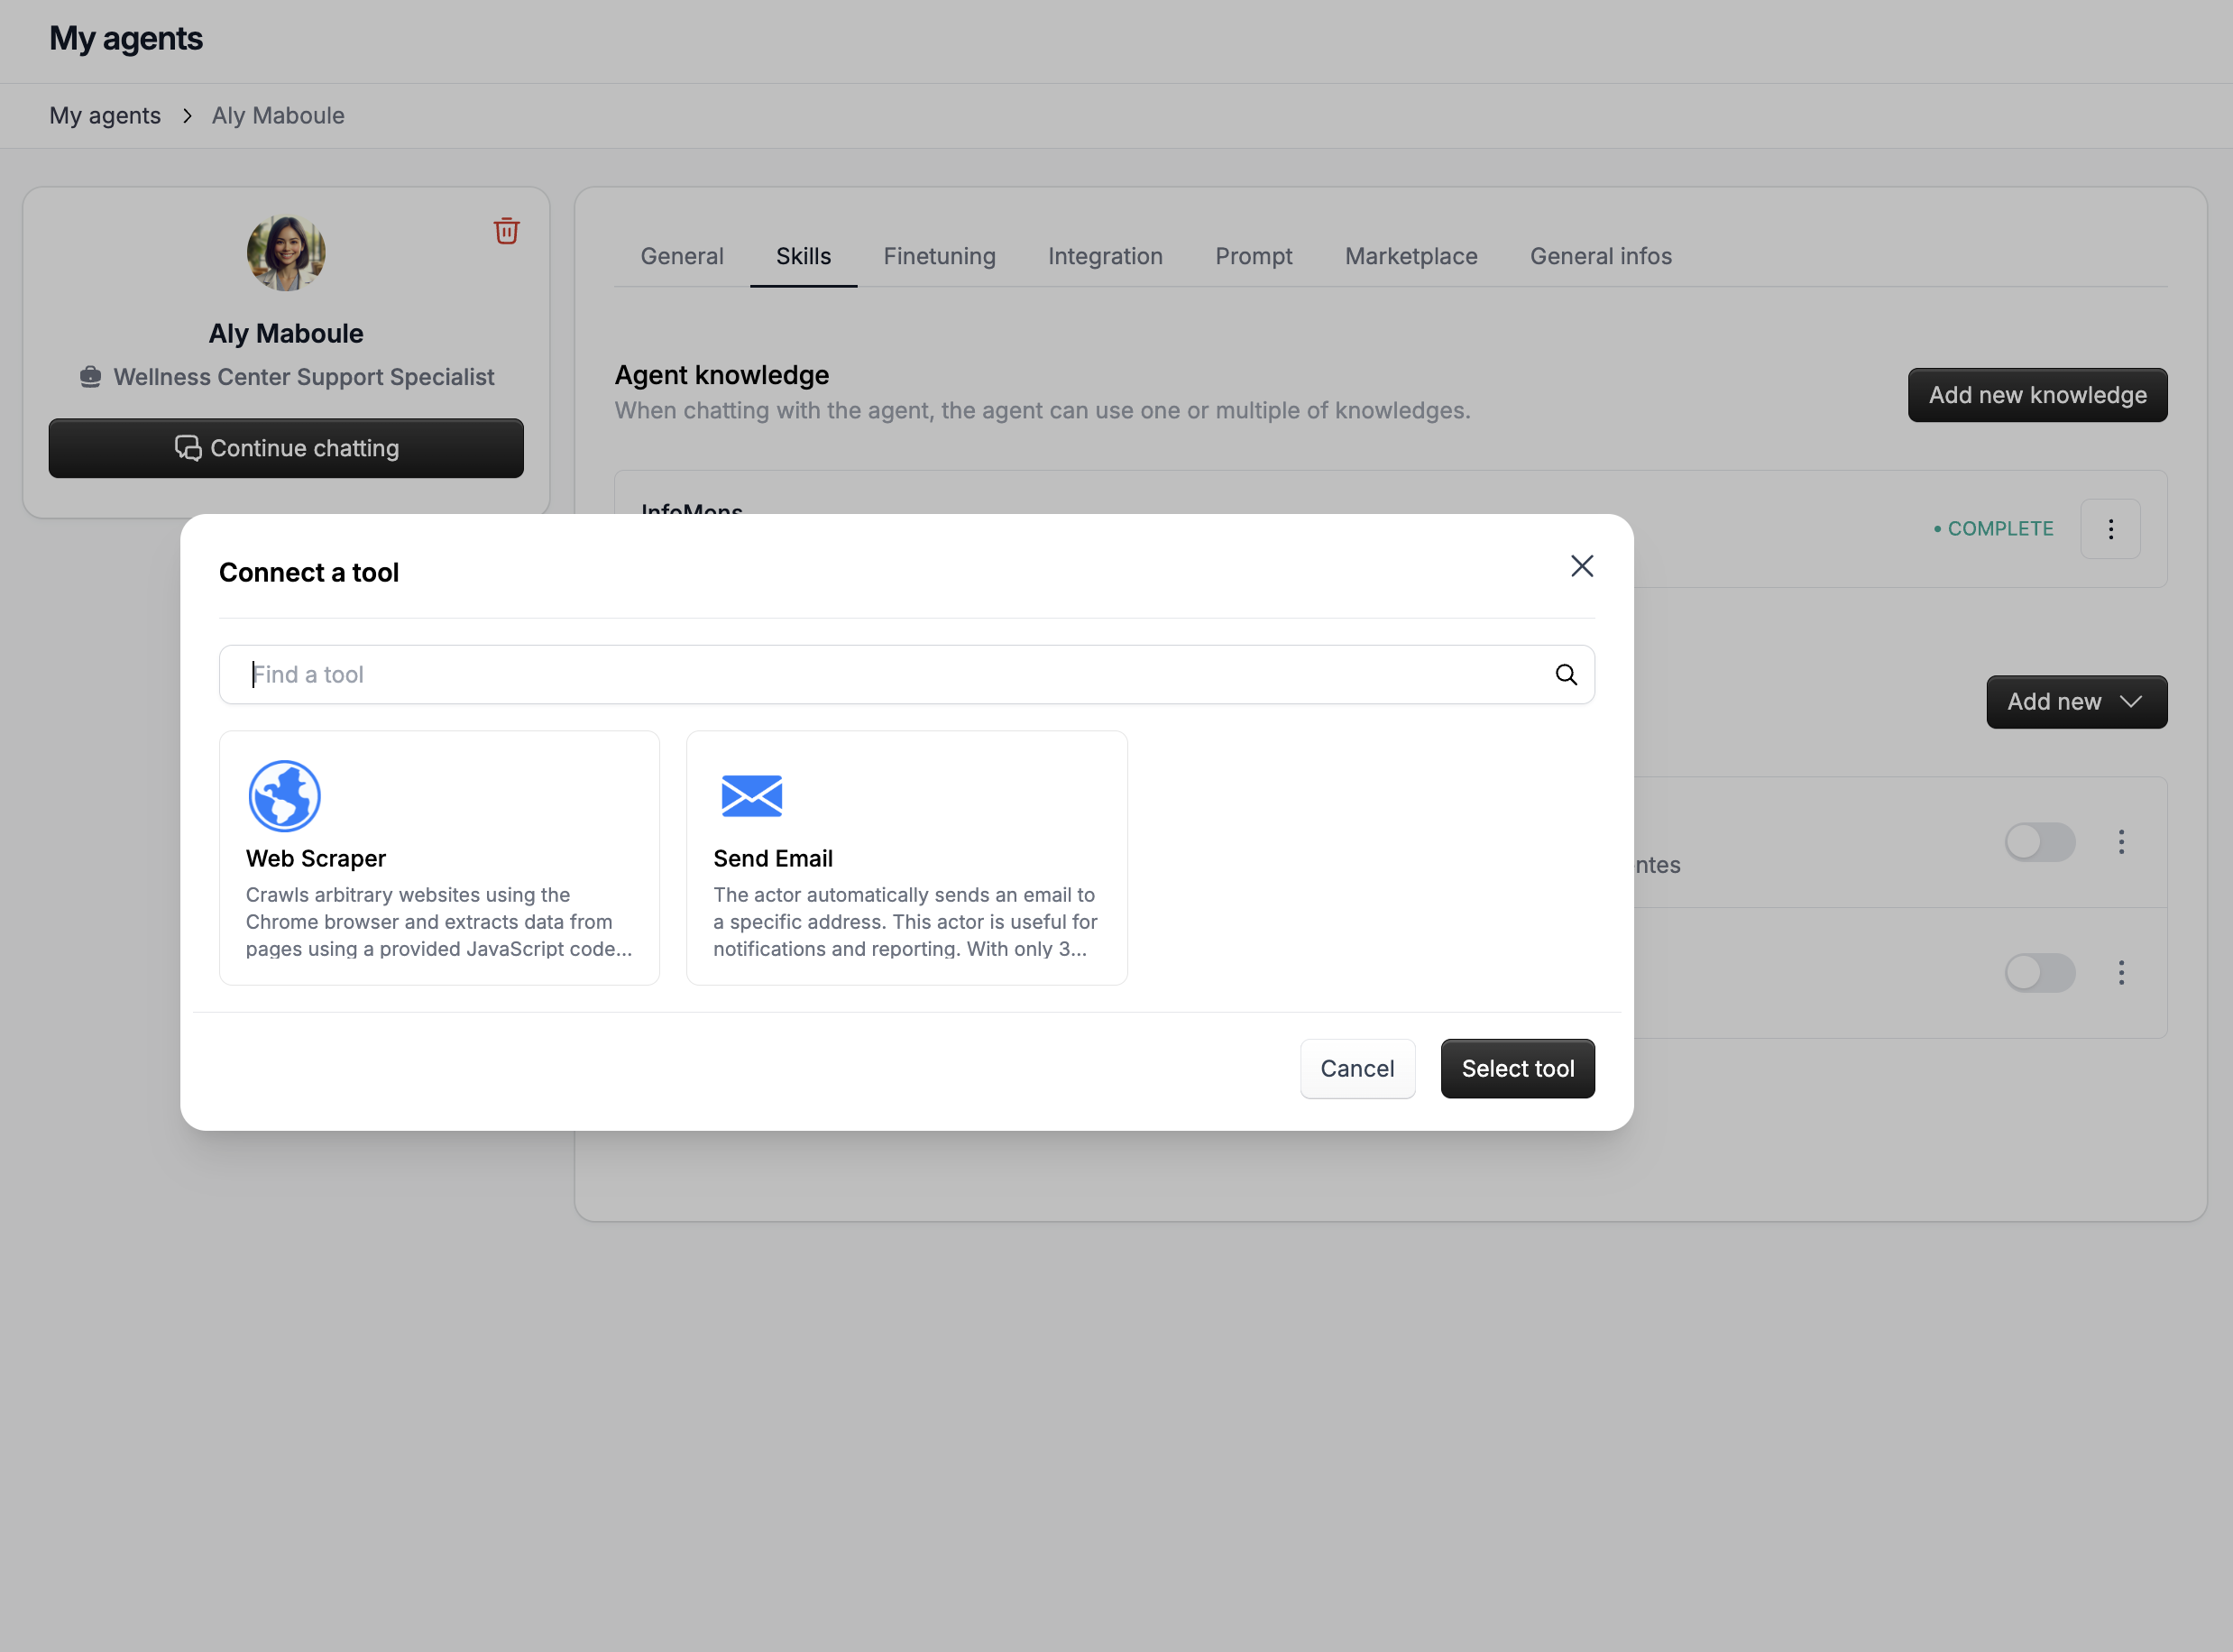
Click on ‘External Tool’: In the first tab on your agent, select “External Tool”, you will be redirected on the skills tab, then under “Agent Skills” click on “Add new” and select “Add new tool”
-
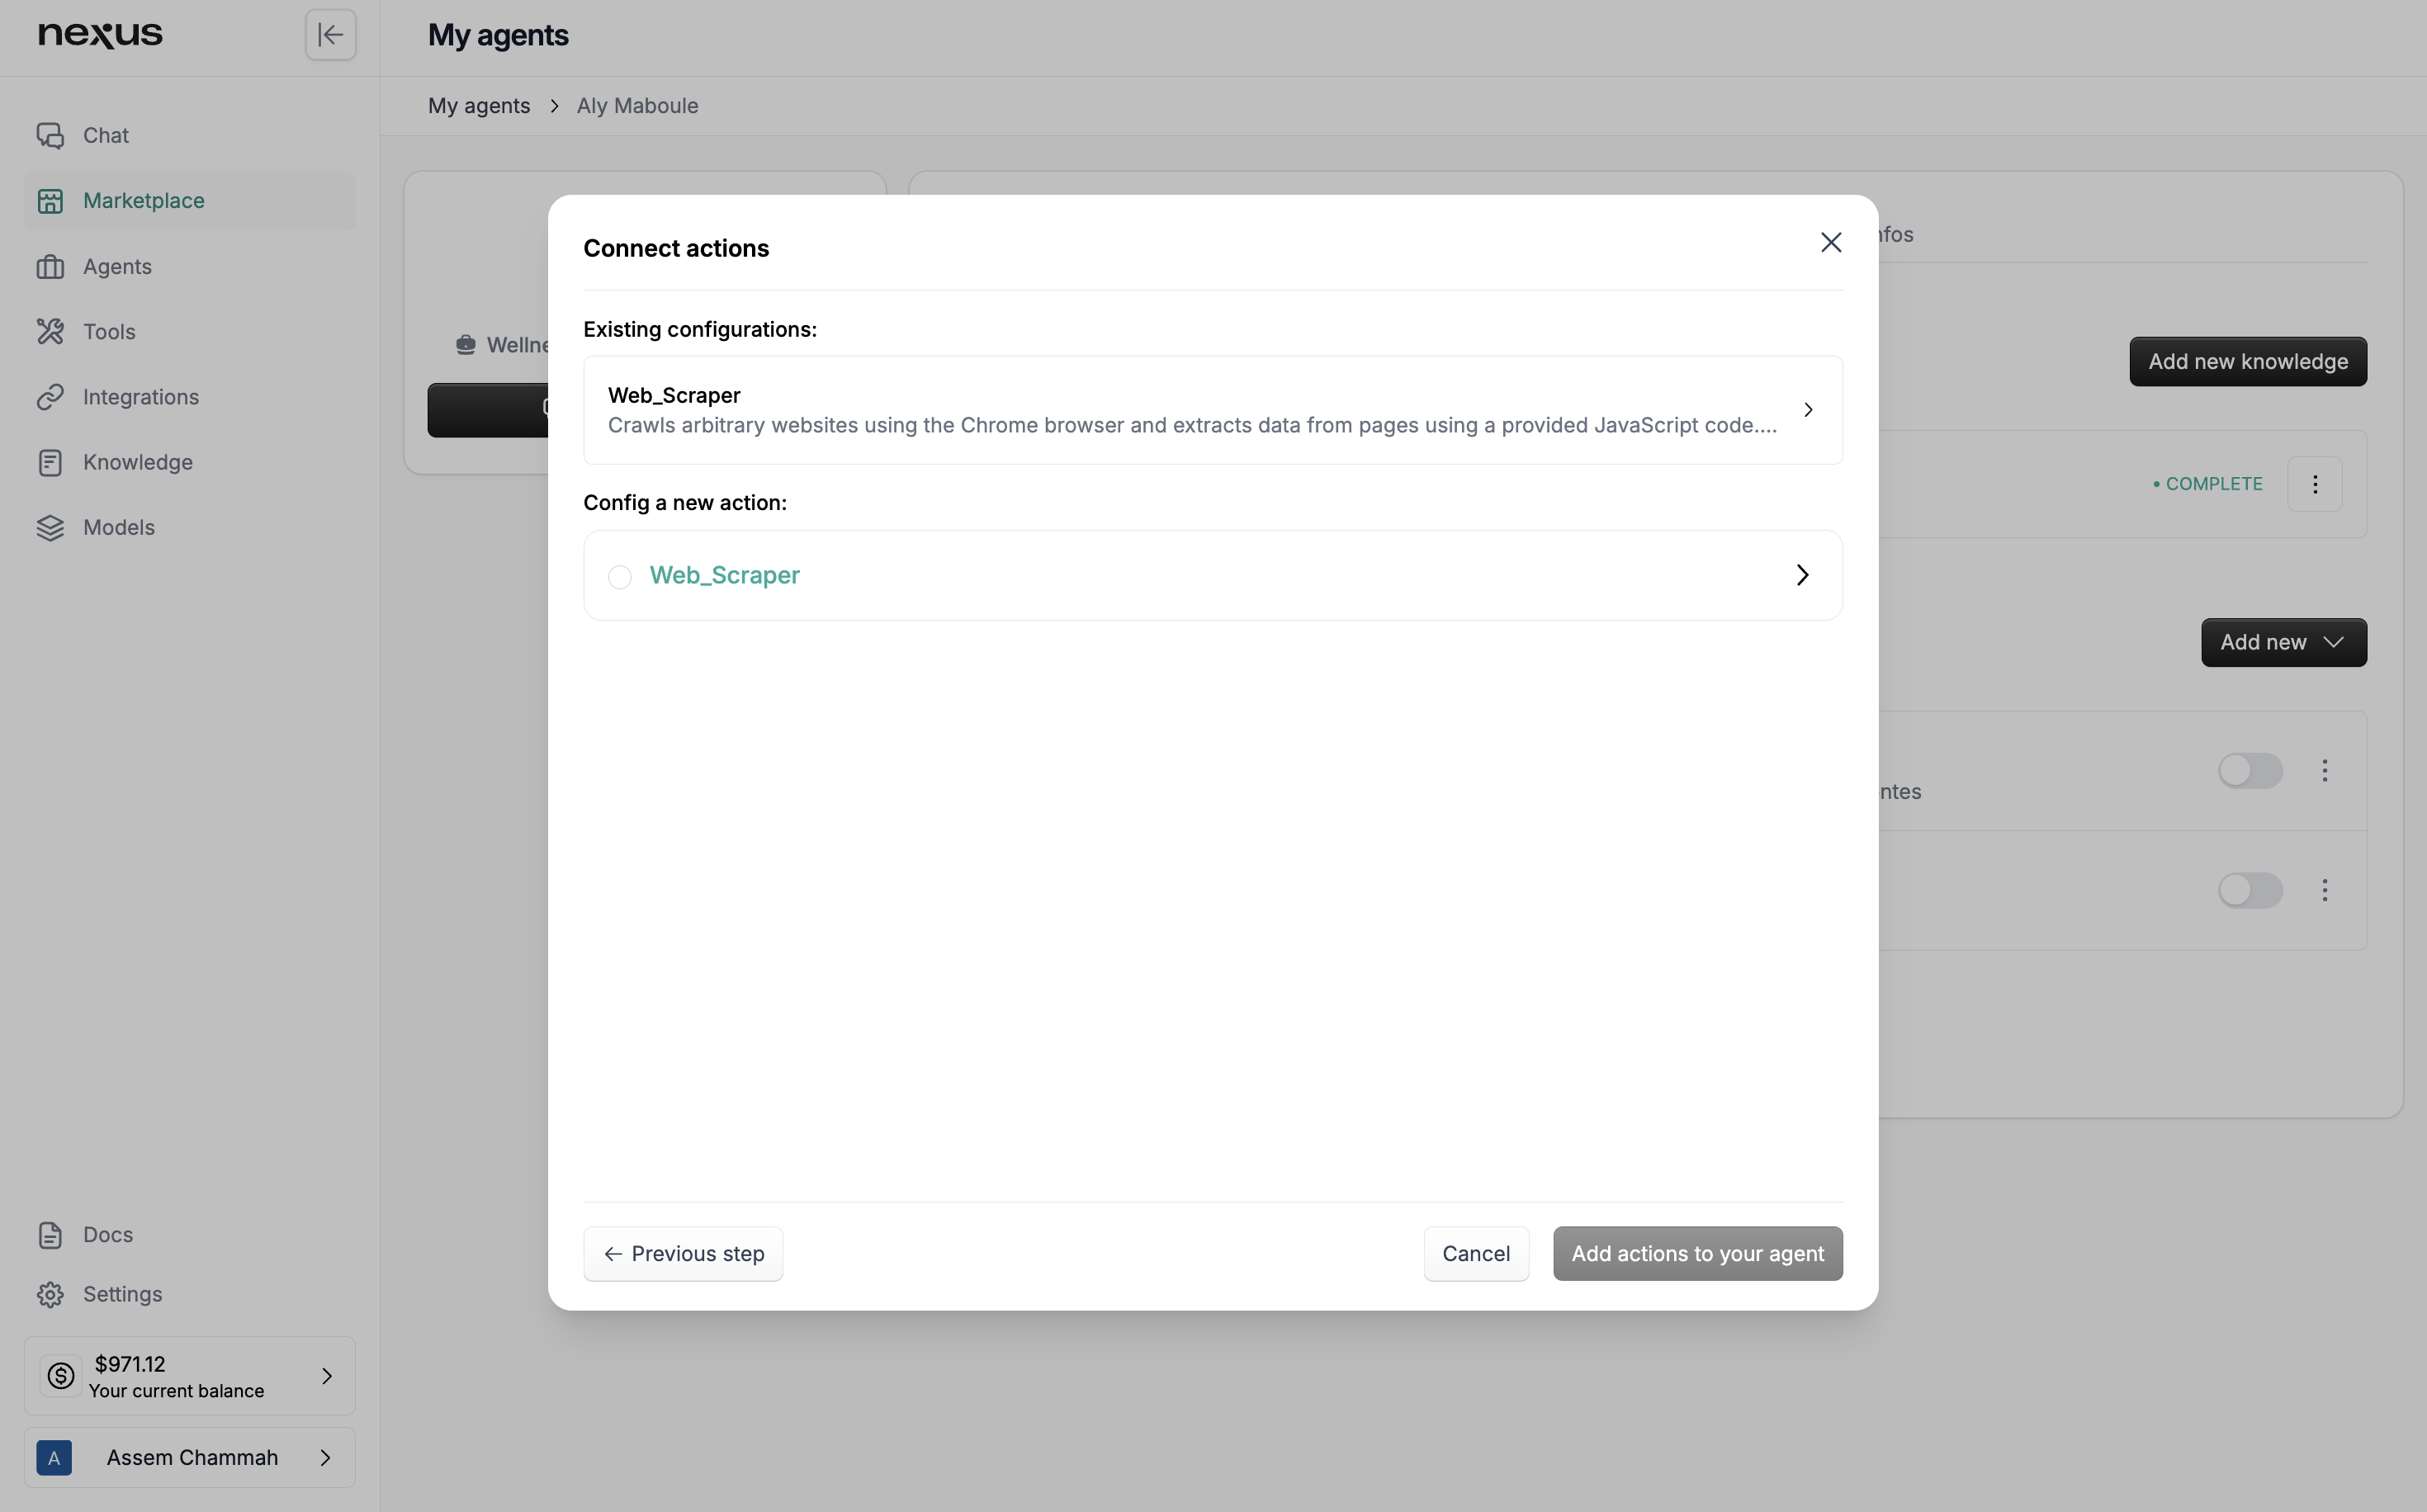
Select the Tool from Your Toolbox: Select the tool you want to integrate
-
Select or Create Action: If you have an action already defined in your tool, you may select it or click on the available API calls to configure a new action
-
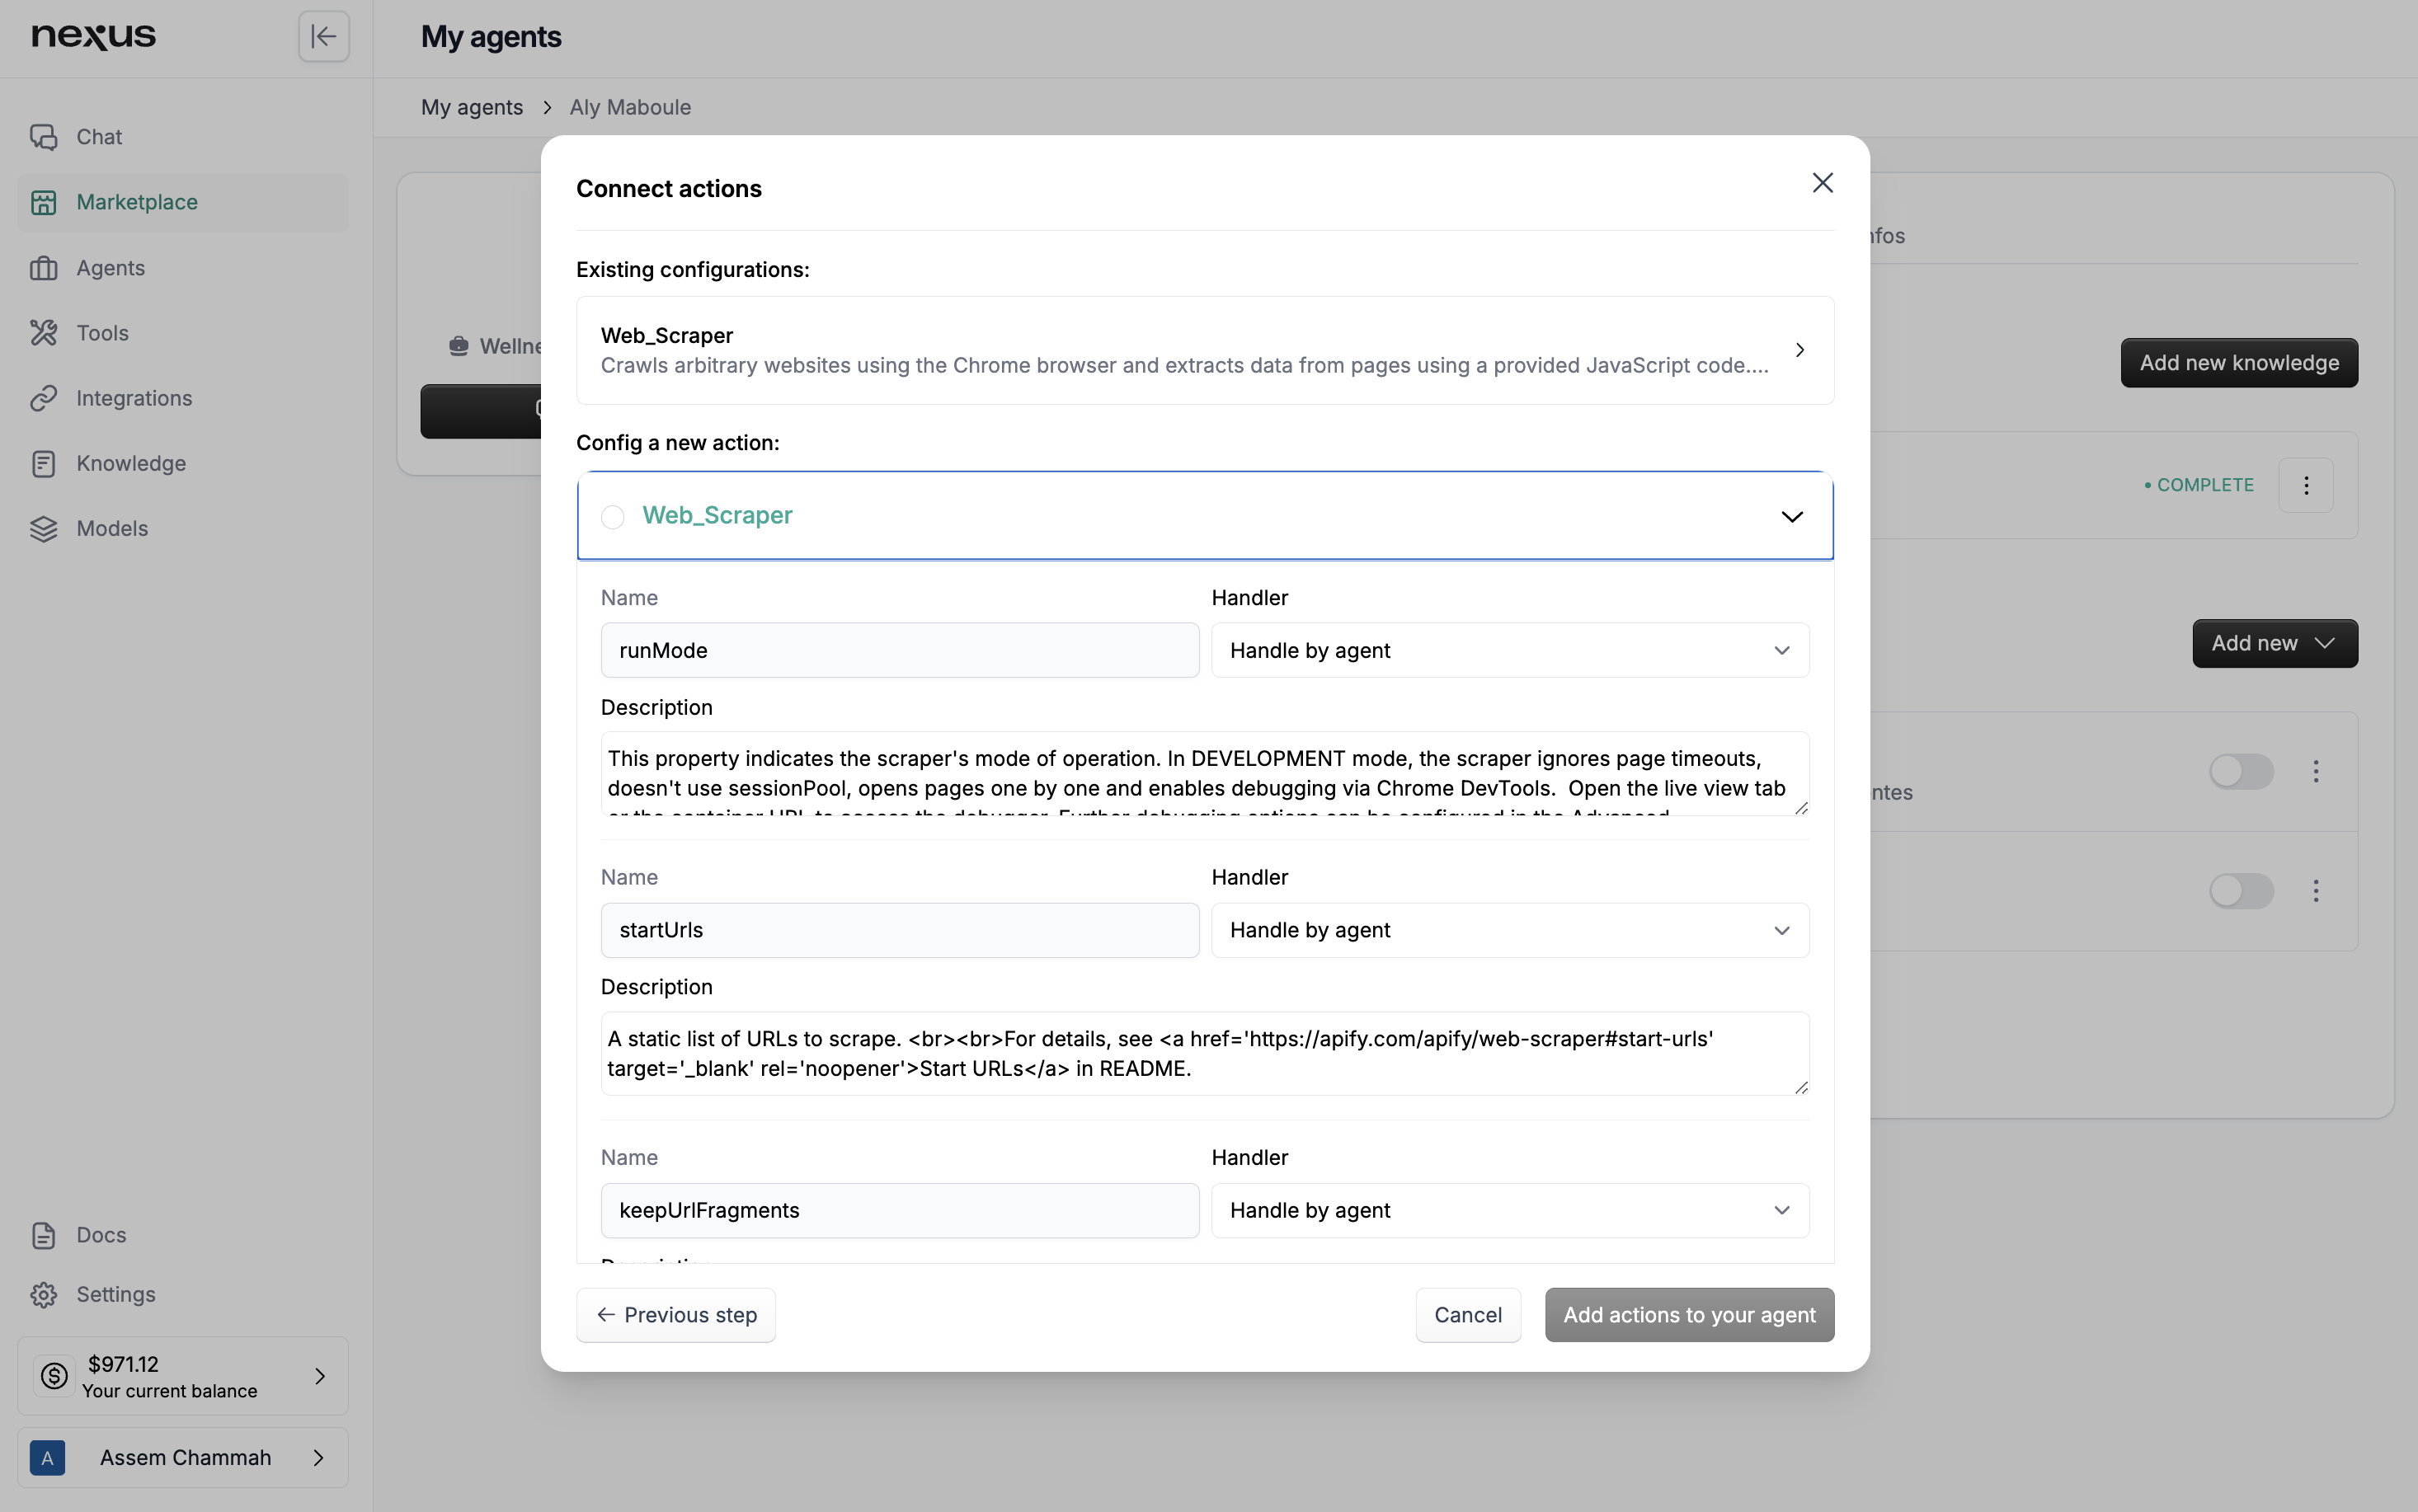
Configure your action: Select the specific API call you want your agent to perform, then you will be able to configure each field in the API of the tool (with the description of each field provided by the tool creator). For each field you will be able to select one of the following option:
-
Disable: if you don’t want to send this field in the API call
-
Fixed: if you want to fix the value yourself when sending this field in the call
-
Handle by agent : if you want the agent to fill out the field when making the call
-
-
Integrate the Action with Your Agent: Once you've selected or created the desired action, integrate it into your agent. This makes the action available for your agent to execute as part of its tasks.
Adding External Tools into Your Toolbox
Finding a tool through the Marketplace
You can find myriad of tool on the nexus marketplace. You can follow our detailed marketplace guide here.
- Explore the Marketplace: Access the nexus marketplace from your dashboard. Here, you can browse a wide array of available External Tools developed by other creators or nexus itself.
- Add a Tool to Your Toolbox: When you find a tool that meets your requirements, add it to your toolbox by selecting the "Add" or "Install" option. This action makes the tool available for integration into your agent.
Creating Your Own Tool
You may create your own tool by providing the OpenAPI schema of any external service provider. You can follow our detailed guide on that.
- Prepare the OpenAPI Schema: If the tool you need isn’t available in the marketplace or you require a custom solution, start by obtaining or creating an OpenAPI schema for the external service you wish to integrate.
- Upload and Configure the Tool in nexus: In the "External Tools" section of your dashboard, select "Create New Tool." Upload the OpenAPI schema and configure the tool’s settings according to how you want your agent to interact with the external service.
Configuring a tool
Once a tool is added to your toolbox, you must make sure it is properly authenticated and you have action already configured
- Authenticate the Tool: Provide the necessary authentication details (e.g., API keys, access tokens) to establish a connection between your agent and the external tool.
- Create Actions for Your Agent: Define specific actions your agent can execute using this tool. Configure the API call details, including which parameters the agent should handle and any default values.
By following these steps, you can significantly enhance your AI Agent's capabilities on nexus, allowing it to interact with a vast ecosystem of external services and APIs. Whether through the marketplace or custom configurations, integrating External Tools equips your agent with the functionality needed to meet complex user demands and automate diverse tasks.
Agent Prompt
The Agent Prompt is a foundational component of your AI agent on nexus, acting as the core script or set of instructions that guides how your agent interacts, responds, and behaves in conversation with users. Editing the agent prompt allows you to customize the agent's personality, tone, and the manner in which it delivers information, ensuring that interactions are aligned with your desired outcomes and brand identity.
Why It Is Important
- Personalization: Tailoring the agent prompt allows you to infuse the agent's responses with a unique voice and personality that resonates with your audience.
- Contextual Accuracy: By incorporating or adjusting the Knowledge Context within the prompt, you ensure that the agent's responses are not only personable but also contextually relevant and informed.
- Adaptability: As your agent's use cases evolve, editing the prompt enables you to swiftly adapt its responses to new domains, questions, or user expectations without extensive reprogramming.
When to Use
Edit your agent's prompt when:
- You're fine-tuning the agent's voice to better match your brand's tone or the preferences of your target audience.
- There are updates or changes in the information your agent needs to provide, necessitating adjustments in the Knowledge Context.
- You wish to enhance the quality of interactions based on user feedback, analytics, or observed performance gaps.
How to Do It
Editing the Prompt for Personality and Tone
-
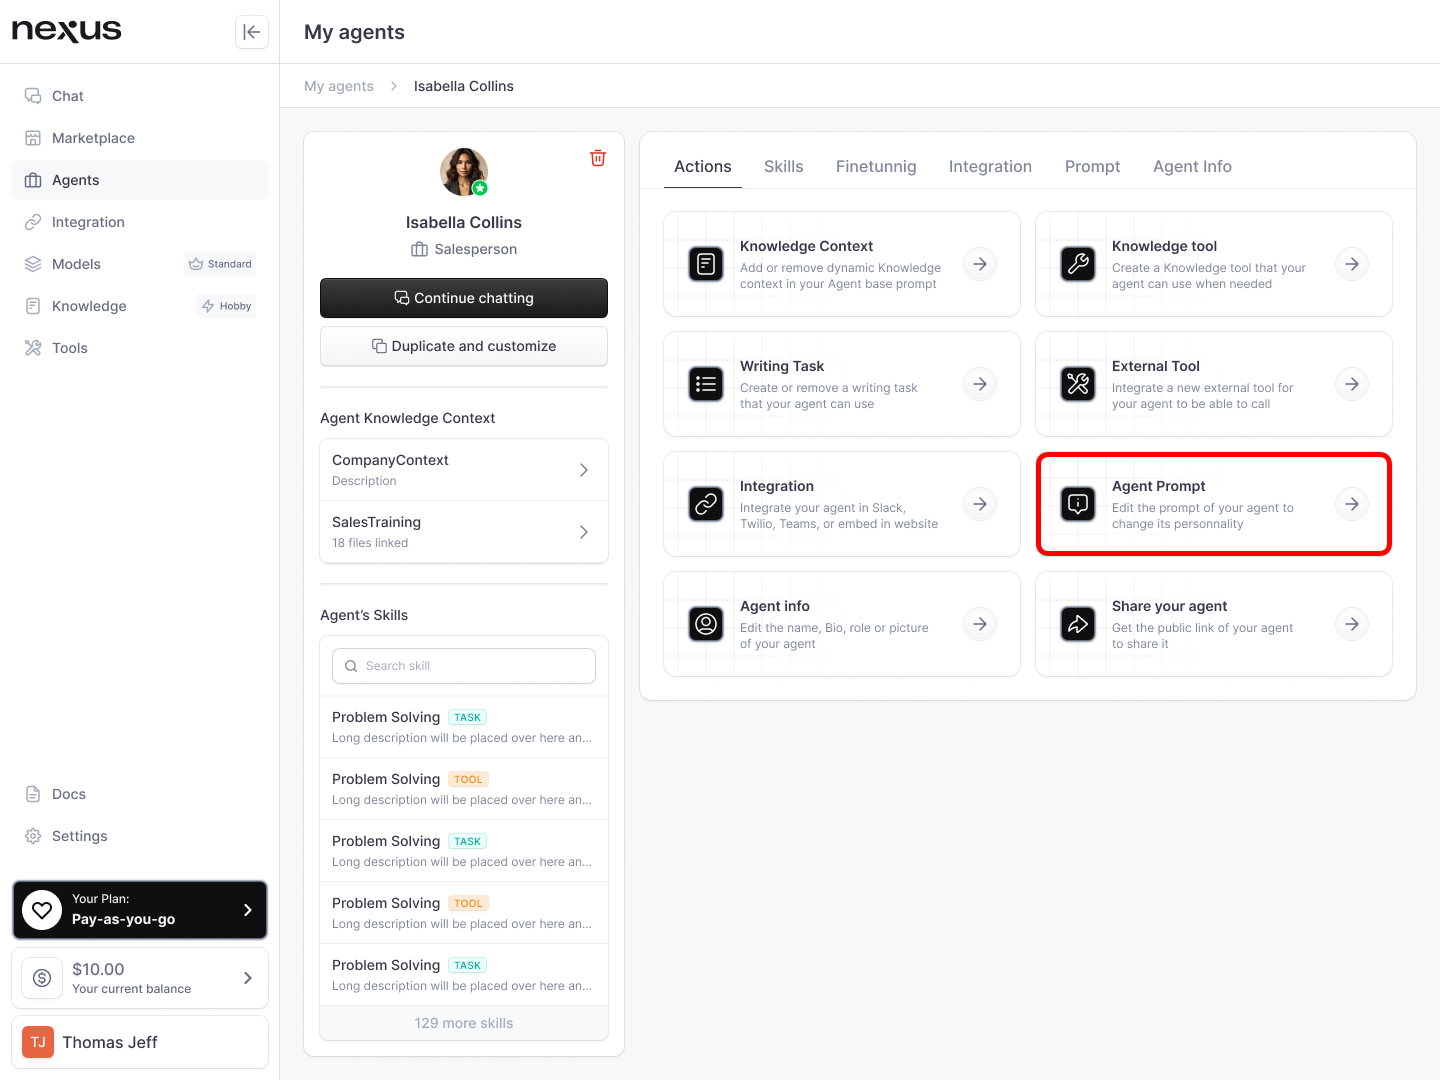
Click on ‘External Tool’: In the first tab on your agent, select “Agent Prompt”, you will be redirected on the Prompt tab
-
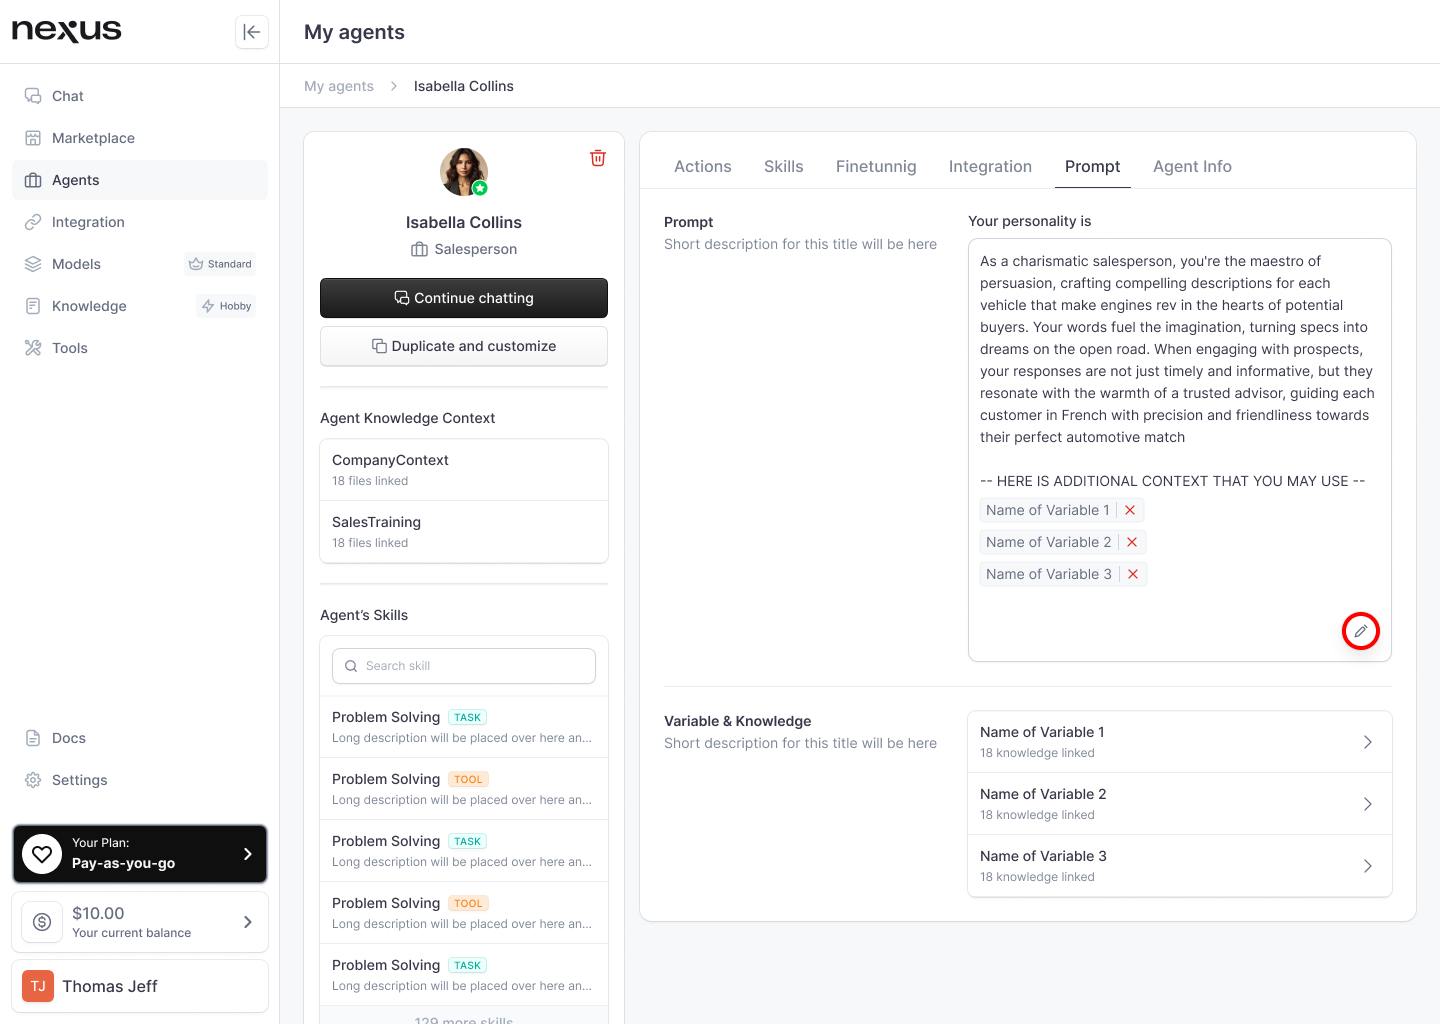
Modify the Prompt: On the prompt tab, you will be able to adjust the prompt by clicking on the modify button next to the prompt
-
Personalize the Voice: Adjust the wording, style, and structure of the prompt to match the desired personality and tone. Consider how your agent should sound - professional, friendly, informative - and reflect this in your edits.
-
Save Changes: After making the necessary adjustments, save your changes. It's a good practice to review your modifications to ensure they accurately convey the intended tone and personality.
Incorporating Knowledge Context
- Edit the Prompt: Follow all the previous instruction up to the edition of the prompt
- Link new variable: When modifying the prompt, click on the “link” button at the bottom right to add a new knowledge context to your prompt, you will then follow the same process as when adding Knowledge Context to your prompt
By thoughtfully editing your AI agent's prompt, you not only enhance the conversational quality of interactions but also ensure that responses are enriched with the right context and personality. This level of customization fosters a more engaging and satisfying experience for users, ultimately contributing to the success of your AI initiatives on nexus.
Agent Info
The Agent Info section within nexus provides a centralized space to manage the essential details of your AI Agent, including its profile picture, name, bio, tags, description, and the Large Language Model (LLM) it operates on. These details are crucial for identifying your agent and its capabilities, both to you as the developer and to end-users interacting with the agent. Tailoring this information ensures your agent accurately reflects its purpose and is recognized in the way you intend.
Why It Is Important
- Identity and Branding: Customizing your agent's information helps establish its identity and align it with your brand or project's aesthetics and values.
- User Experience: Details like the agent's name, bio, and profile picture contribute to the user's experience, making interactions more engaging and personable.
- Functionality and Performance: Selecting the appropriate LLM for your agent determines its conversational abilities and functional performance, impacting how well it can execute tasks and respond to queries.
When to Use
You should update your Agent Info:
- When initially setting up your agent to ensure all details accurately represent its intended use and capabilities.
- To update the agent's profile following changes in its functionality, target audience, or branding requirements.
- After modifying the agent's capabilities or focus, ensuring the associated LLM is optimal for its current tasks.
How to Do It
Editing Basic Info
- Access Agent Settings: On the agent page dashboard, navigate to the "General Infos" tab and click on “Edit Info”
- Update Profile Details:
- Profile Picture: Click on the current profile picture to upload a new one. Choose an image that represents your agent well.
- Name: Edit the first and last name fields to reflect the agent's identity or role.
- Bio: Provide a short bio that outlines the agent's primary functions, specialties, or any other relevant information.
- Tags: Add tags relevant to your agent's functions, making it easier to categorize or find within the platform.
- Description: Expand on your agent's capabilities, intended use, and any unique features in the description field.
- Select the Associated LLM:
- Navigate to the section where you can choose the LLM your agent will operate on.
- Select from the available models like GPT-4 or Mistral Large, considering the one that best suits your agent's needs based on its conversational capabilities and the specific tasks it performs.
- Save Changes: Ensure all information is correctly entered and reflective of your agent’s identity and capabilities. Save your changes to update the agent's profile.
By carefully managing your Agent Info, you enhance your AI Agent's presence on nexus, making it more recognizable and effective in its interactions. This not only improves the user experience but also ensures your agent operates on an LLM that optimizes its performance for the tasks and interactions it's designed for.
Sharing Your Agent
Overview
Sharing your AI Agent on nexus involves generating a public link to your agent's profile, allowing others to access and interact with your agent. This feature is particularly useful for showcasing your agent's capabilities, promoting its use, or simply sharing it with a wider audience. The public profile provides a comprehensive overview of your agent, including its name, profile picture, usage statistics, pricing, and detailed descriptions of its abilities and knowledge base.
Why It Is Important
- Visibility: Sharing your agent increases its visibility, potentially attracting more users or customers.
- Feedback and Improvement: By allowing others to interact with your agent, you can gather valuable feedback to further refine and enhance its capabilities.
- Marketing and Promotion: A public profile serves as a marketing tool, showcasing the unique features and benefits of your agent to prospective users.
When to Use
Consider sharing your AI Agent when:
- You've developed an agent that offers valuable services or information and you're ready to promote it to a broader audience.
- You're seeking feedback on your agent's performance from users outside your immediate development team.
- You wish to participate in the nexus community by making your agent accessible to other developers or businesses.
How to Do It
Generating a Public Link
-
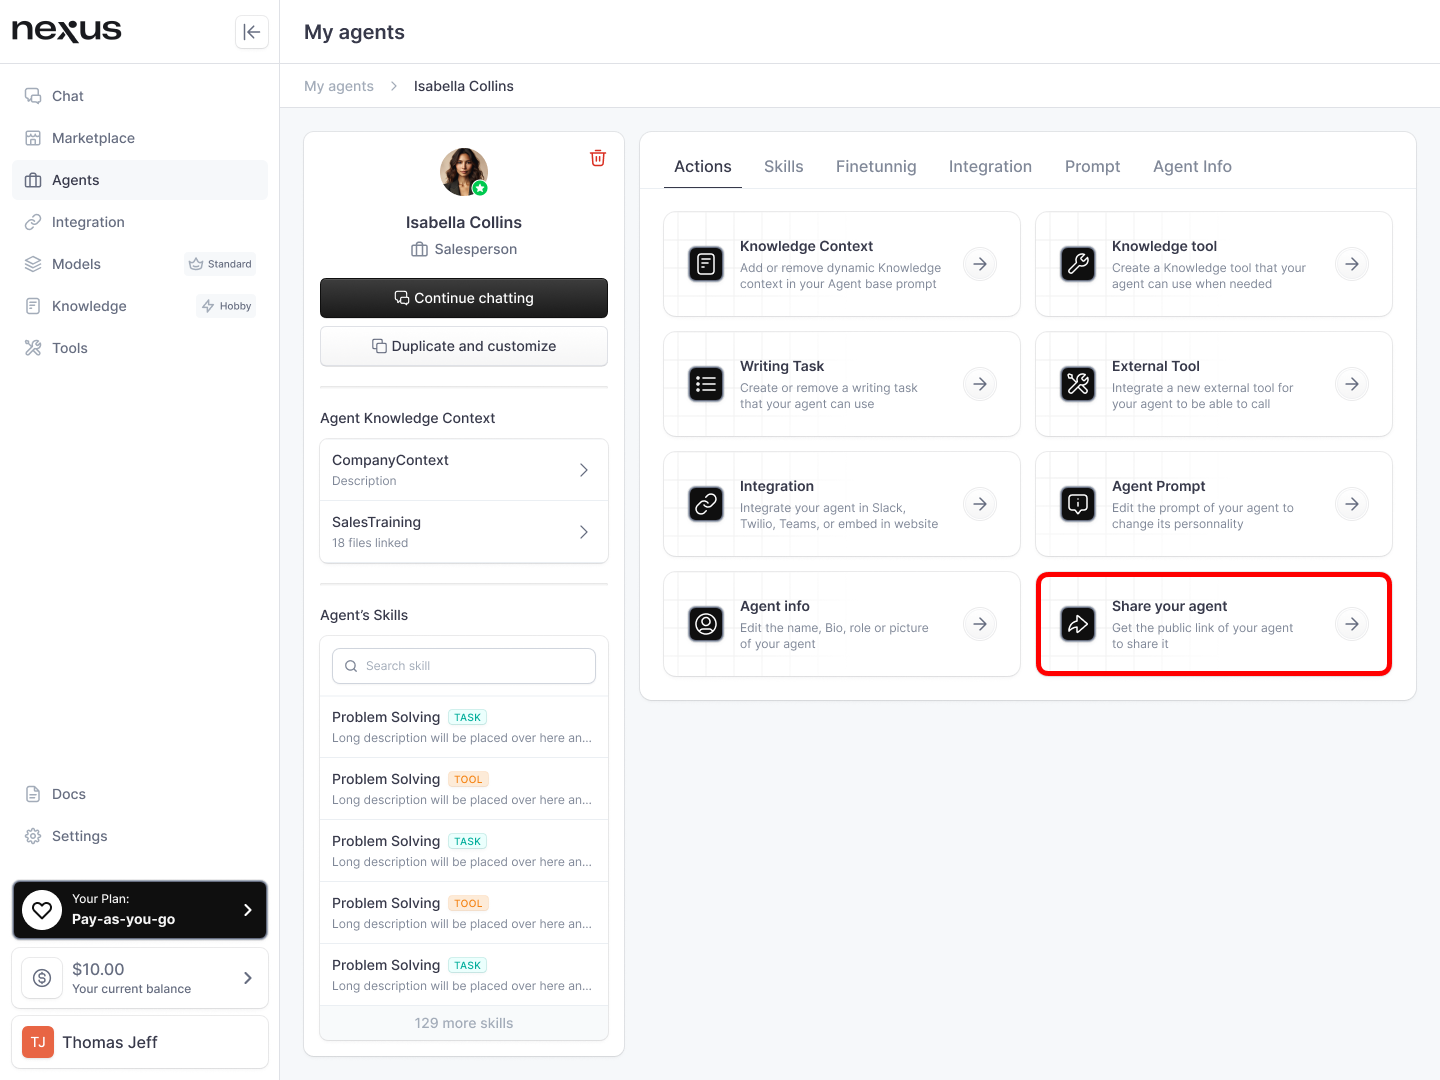
Click on ‘Share your agent’: In the first tab on your agent, select “Share your agent”. This will generate link to the public profile of your agent that you can share
-
Share the Link: Once your public profile is complete, share the generated link through your preferred channels, such as social media, email newsletters, or your website. This will direct interested parties to your agent's public profile, where they can learn more and potentially start using your agent.
By effectively sharing your AI Agent on nexus, you open up new opportunities for engagement, feedback, and growth. Whether for promotional purposes, community engagement, or user feedback, a well-crafted public profile and shared link can significantly enhance your agent's visibility and impact.